High Plains Modelers Pages

July 31, 2013

July 2013 Meeting

    For at least the third month in a row, HPM saw record attendance at a regular meeting. Seventeen members and our guest, Mark Persichetti, squeezed into the Hobbytown USA basement to plot murderous vengeance against our styrene enemies. Well, if the NSA is reading this, actually we just did some knitting and recited poetry to each other while drinking warm milk. Such a nice time. ;)
   Once again we had the pleasure and honor of hosting Mark Persichetti while he filled us in with an update on the IPMS Nationals, coming in August. It sounds like things are really starting to ramp up there and we wait with bated breath to meet fellow modelers from across the country. Should be a good time.
    HPM member Tomasz gave a small presentation on the progress of the HPM group build that we'll be presenting at Nats. The hangar looks beautiful and other members came together with their pieces to the puzzle to coordinate and plan future progress. A dedicated Build & Bull will take place soon as the construction closes in on completion here as well.
   Finally, the highlight of the meeting was the Show & Tell. Nine club members brought in their latest work. Take a gander at the pics below. See ya next time!

Tomasz gives an update on the group build with hangar.

Marty's F-86D Sabre

Chris's F/A-18E Super Hornet

Jeff's Formula 1 racer. An unfortunate accident saw it damaged, but it was still impressive. We hope he's able to fix it.

One of Scott's two resin buildings. Unfortunately the pic of the other building didn't turn out, but both builds looked great.

Gary's gets creative with a cow-milking vignette.

Pablo is "go for 1st place" with this 1/100 shuttle Discovery.

Tomasz' impressive JU-88.

Chip tackles an SR-71 (actually an M-21) with its D-21 drone. Looking good in a rare silver finish for this aircraft.

July 25, 2013

Squadron - Armor in Action WWII US Sherman Tanks


Reviewed by: Pablo Bauleo (IPMS #46363)
Review Product Type: Armor
Review Type: Publication
ISBN No.: ISBN 978-0-89747-630-0
Publisher: Squadron Signal Publications
Author: Rob Ervin and David Doyle
Illustrations: Don Greer
Line Drawings: Melinda Turnage
MSRP: $18.95
Provided by: Squadron Signal
Vendor Web Site: www.squadron.com


Review:

The M4 Sherman is probably the most easily recognizable American tank ever built. This book focuses in the variants and used by the American Army in World War II.

Variants cover include: Small Hatch M4, Small Hatch M4A1, Small Hatch M4A2, Small Hatch M4A3 75 mm, M4 Composite, M4 105 Howitzer, Large Hatch M4A1 (76)W, Large Hatch M4A2, Large Hatch M4A3 75 mm, Large Hatch M4A3 (76)W, M4A4 (105), M4A3E2, M4A6, M4A3E8 and a section devoted to specialized uses like Amphibious (DD Tanks), Bulldozer, Flamethrowers, etc.

The book is profusely illustrated with close to 200 B&W pictures and several color period pictures as well. There are just a few color profiles. The book covers variants that saw services in North Africa, Italy, D-Day, the Western Front -including the Batte of the Bulge- as well as the Marine's use of the Sherman in the Pacific.

Detailed line drawings provide details of each sub-variant, including details on the turret, hull, tracks and weaponry. Although most pictures with personnel are likely to be staged, several pictures have military personnel in them providing an insight on military uniform and gear.

Squadron Signal Publications has published a book named "Sherman In Action" (Armor 16). I do not have it, so I cannot tell you the differences between this edition and the previous one. However the authors are different, hence it is not a re-issue of the older book.

Modelers will find the line drawings very useful, while the pictures provide great ideas for dioramas. Recommended to armor modelers and historians.

I would like to thank Squadron Signal Publications and IPMS/USA for the review sample.


Eduard - 1/48 Rocket Launcher UB-16 and UB-32

Reviewed by: Pablo Bauleo (IPMS #46363)
Review Product Type: Aircraft
Review Type:  Detail
Scale: 1/48
Manufacturer: Eduard Models
Manufacturer website: www.eduard.cz
Mfr Stock No. 648025
MSRP: $19.95
Provided by: Eduard Models
Vendor Web Site: www.eduard.cz


Kit Review:

Czech manufacturer Eduard continues expanding its "Brassin" line of detail parts for aircraft. This time they are offering the UB-16 and UB-32 rocket launcher which has seen widespread use in Soviet designed aircraft, like L-39, MiG-21/23/27, Su-7/17/20/22, and Yak-28/38.

The detail kit includes 10 resin parts (casted in two different resin colors) and a small PE fret with another 6 parts. Resin parts are nicely detailed with great surface detail and very cleanly casted, with small pour stabs. Photoetch parts are exquisitely thin and very easy to work with.

It took me a total of 30 minutes to get all four rocket launcher assembled. The assembly is simple and straightforward but releasing the parts R3 and R4 (rocket launcher back cones) from their pour stabs requires some dexterity and a very thin razor or saw. Those parts are most fragile parts of the whole detail set.

As it seems to be the standard in the Brassin line, instructions do not include color references. I wish color references were included in the instruction sheet. I've downloaded the instructions for their Mig-21 and got the color information from there.

I've painted my rocket launchers "steel" (Model Master enamels). I took advantage of the resin parts being casted in two different shades of gray as to have some color variation. I've applied a coat of Future and an oil wash to bring up detail to give them a 'well-used' look.

Given the fragility of resin parts R3 and R4, I recommend this detail set for intermediate modeler with experience handling fragile parts. These rocket launchers are a simple way to enhance your model and if you have some experience handling fragile parts you should have no problems with this aftermarket set.

 I would like to thank Eduard Models and IPMS/USA for the review sample.


Mushroom Publications - P-47 Bubbletop (Yellow Series #6123)

Reviewed by: Pablo Bauleo (IPMS #46363)
Review Product Type: Aircraft
Review Type: Publication
ISBN No.: ISBN 978-83-61241-27-6
Publisher: Mushroom Model Publications
MSRP: $23
Provided by: Mushroom Model Publications
Vendor Web Site: www.mmpbooks.biz

Kit Review:

The P-47 "Thunderbolt" went through a major design upgrade in 1943, when its canopy and back fuselage was modified to be a "bubbletop". Based on the information in the book the 'inspiration' for this modification was the RAF Hawker Typhoon.

This book covers all the "bubbletop" production variants from P-47D-25 to the final version, the P-47N, including all the related prototypes.

The first section of the book is dedicated to technical details on each prototype and production variants. There are plenty of historical pictures for each variant including foreign operators and post war operators and even a few historical color pictures too.

The second part of the book is a "walk around" of different P-47 preserved in museums. The walk around is neatly organized by "fuselage", "tails", "landing gear", "engine", etc.

Finally the book has artist's color profiles for 38 airplanes. Some of the drawings are only side views, but others include top views as well.  The color profiles shows the markings of the USAAF, several Air National Guards, and several foreign operators like RAF, Italian AF, Mexican AF, Nicaraguan AF, Iranian AF, Ecuadorian AF, Yugoslavian AF, Chinese AF among others.

Through the pages of the book 1/72 scale line drawings are included. As a bonus, the book has 1/48 and 1/32 scale line drawings in separate fold out sheets.

This is the "2nd Edition" of the book, which says it is "expanded" but as I don't have the 1st edition, I cannot tell which sections have been expanded.

Modelers will find very useful the walk around and line drawings, while the color profiles are a source of inspiration for future builds. Recommended to all "Jugs" enthusiasts.

I would like to thank Mushroom Publications and IPMS/USA for the review sample.


ICM - 1/72 Soviet PAG-14 Airfield plates

Reviewed by: Pablo Bauleo (IPMS #46363)
Review Product Type: Aircraft
Review Type: Kit
Scale: 1/72
Manufacturer: ICM
Manufacturer website: www.icm.com.ua
Mfr Stock No: 72214
MSRP: $11.90
Provided by: Hobbyterra
Vendor Web Site: www.hobbyterra.com


Review

ICM has a growing line of 1/72 soviet jets and now it is providing modelers with a simple and cost effective way to enhance how to display our models: PAG-14 Airfield plates. I must confess, I don't know anything about those plates nor I was able to find any online reference so I cannot speak as to their accuracy.

You get 32 individual plates, each one with dimensions of 82 by 27 mm. The plates have some nice texture which gets highlighted with either a wash or drybrushing. The parts have medium size attachment points to the sprue (typical of ICM) and some sanding is required to clean up the parts.

There are no decals nor instruction provided with this set, but the back of the box includes some recommended paint color and a generic configuration for the plates. Of course you can set them in any configuration you want, but the recommended one will likely match the general shape of any modern jet. Using the recommended configuration the base has dimensions of 362 by 216 mm

I glued the plates side-by-side to each other but the whole base was a bit flimsy.  To provide some strength to the whole base, I cut a cardboard base and attach it to the back of the base with double-sided tape. I've applied some pre-shading and post-shading with my airbrush, as to add some depth to the base.

I would recommend this kit to modelers of any skill level that want to highlight their 1/72 scale modern jets.

I would like to thank ICM, Hobbyterra (http://hobbyterra.com) and IPMS/USA for the review sample.


Realistic Model Car Distributors

HPM member Cody creates realistic looking caps & wires by making a centering dent with a straight sharp scribe & drills each hole with a #80 bit & super glues a wire in each one. He does the same with the spark plugs. Cody prefers to use Detail Master plug wires.

How to Avoid Clogged Super Glue Applicators

Some HPM members share their methods of dealing with those pesky clogged super glue applicators:

-Pablo purchases spare applicator tips & caps in packs of 10 & replaces them when they clog.

-Larry says he taps the bottle on the table & blows into the applicator tube.

-Chris buys a multi-pack of mini super glue tubes. Wiping the nozzle & cap before re-sealing it is usually enough to avoid a clog. If a tube does clog, just toss it & open a new one.

July 24, 2013

Masterbox - 1/35 Domestic Animals


Reviewed by: Pablo Bauleo (IPMS #46363)
Review Product Type: Diorama
Review Type: Kit
Scale: 1/35
Manufacturer: Masterbox
Manufacturer website: www.mbltd.info
Mfr Stock No: MB 3566
MSRP: $13.00
Provided by: Dragon Models
Vendor Web Site: dragonmodelsusa.com


Kit Review:

The domestic animals set is a welcome addition to the 1/35 scale diorama, adding some more every-day objects (or animals) to the traditionally military-focus aspects of dioramas.

Masterbox has released a single sprue of 26 parts containing two cows and one goat. The box shows two goats, but it is just two suggested painting options. The sprue attachment points are medium sized and some part preparation and cleaning is needed. Care is needed when removing parts from the sprue as to avoid damaging detail. Overall detail is good, with clearly detailed faces, eyes and ears. You can even see the ribs in the cow sides. The goat fur might be a bit overdone but that makes painting and washing easier.

The parts have no locating pins and there are some mold lines that need to be removed. The mold lines tend to run along the legs and bellies of the animals. The overall fit is below average. I've used a few clamps to get the parts to fit and I then ran liquid cement along the join. Still I needed some putty and sanding, mainly along the back and the neck areas of the cow. The goat parts have a better fit than the cow.

Scale accuracy is difficult at best when dealing with 'live objects' due to the natural variation on size of animals, but from my measurements the cow and goat backs are about 3 and 4.5 feet tall, respectively which seems to be about right.

The sprue has a limited-run flavor to it given that has no location points, the medium size sprue attachment points and prominent mold lines. I would recommend this set for the averaged to experience modeler.

I would like to thank Masterbox, Dragon Models (www.dragonmodels.usa) and IPMS/USA for the review sample.


Foundry Publications - Painting Figures Master Class

Reviewer: Pablo Bauleo
IPMS: # 46363

Publisher: Foundry Publications
Product: Kevin Dallimore's Painting and Modelling Guide Master Class
         Hardcover
         308 pages
         ISBN 978-1-901543-20-9
MSRP: $ 63

Review

Kevin Dallimore's book might be the one-stop shop for the figure painter. It briefly covers the basics of figure preparation and painting (showing step by step pictures of the 3-color method) on the first 30 pages and then dives into different painting styles and projects. Some of the techniques described in the book includes: 5-color method, dry-brushing; diluted washes; non-metalic paint for metallic looking finishes; textured leather; ancient shield painting; skeletons and more.

The above techniques are applied to a wide range of subjects, from Napoleonic figures, to Ancient Romans, Sci-Fi, Fantasy figures (orcs of all kinds and colors), WW2 paratroopers, Old West characters and animals. Step-by-Step pictures clearly explain and show how to achieve realistic finishes by methodically applying the techniques described in the book.

The author has invited writers in different sections of the book that highlight particular techniques and finishing details. I really like the style of including other writers in the book. It allows for a more complete and comprehensive approach to figure painting by having different people to explain how to apply different techniques and achieve different effects.

The book also includes some special sections on making bases, vehicles, diorama and figure conversion by showing how to re-positioning arms and legs if needed. One highlight of the special sections is the scratch-build construction of a 30-inch long African river steamer with space for 75 28-mm figures!

Foundry color paint names are used thoroughly in this book, but it does not limit the value of the book, as the color names are descriptive and the shade/highlight method can be made from your own paints by mixing them as needed.

 The book has a series of appendixes that include the paint color range, brushes and modeling equipment from the Foundry Line.

This book is recommended to the intermediate and advanced figure painter. I would like to thank Foundry Publications and Casemate Publishing for the review copy.


Eduard - 1/48 Su-7 ejection seat (Brassin)

Reviewer: Pablo Bauleo
IPMS: # 46363

Manufacturer: Eduard
Product: Su-7 Brassin Seat (Product  #648024)
MSRP: $12.95


Review

Czech manufacturer Eduard keeps expanding its Brassin line of aftermarket details this time with the release of the ejection seat for the KP Su-7 in 1/48th scale. A while back Eduard re-boxed the KP kit adding some aftermarket goodies, including this seat.

The seat is now available as a stand-alone upgrade for those that already have the KP kit in their collection. In my opinion, the seat is the weakest point of the whole (original) plastic cockpit and Eduard is offering us the solution.

Eduard provides you with 2 exquisitely molded resin pieces and a pre-colored photo-etch fret for seatbelts and other minor placards and color details.

Construction is very simple and straightforward: I've soaked and air dry the resin pieces in bleach (to remove any mold release residue, although I don't think there was any), airbrushed the seat, paint-brushed the seat cushion and head-rest. I've got a few cracks on the paint at the head-rest, but I kind of like it, as it looks like if the leather would have cracked due to hard use. Then I applied the photoetch parts and finally a raw umber oil wash was applied to bring up detail.

Total construction time was in the order of 45 minutes, spread over 3 sessions. The longest building session lasted about 30 minutes and it was spent working with the photoetch parts. I did managed to lost one PE seat belt part to oblivion, but even with the missing piece the seat looks busy enough.

Another nice touch: the re-sealable plastic package. The plastic blister is designed to be re-closed and allows storing parts between building sessions. It is just a minor detail, but Eduard shows its thoughtfulness toward us, the modelers, by doing that.

There is one thing that could be improved: the instructions lack color painting references. I had to download the Su-7 profipack instructions in order to get some indication on the colors needed for the seat.

The Brassin Su-7 seat is a little gem that I will recommend to modelers experienced handling small parts. There is some photoetch bending involved, so having photoetch experience is a plus.

I would like to thank Eduard for the review sample.


Osprey - 53 Stormo Aviation Elite Units


Reviewer: Pablo Bauleo
IPMS: # 46363

Publisher:     Osprey Publishing
Title:         53 Stormo
Volume 38 of Aviation Elite Units
Author    Marco Mattioli
Illustrated     Richard Caruana
ISBN    978-1-84603-977-5
128 Pages, 39 color profiles plus 9 unit badges
$25.95 MSRP


Review

Given the tactical organization of the Regia Aeronautica during World War II, this book cover the story of all the different Gruppi that were part of the 53 Stormo during World War II. The Regia Aeronautica organized their units in the basis of a Squadriglia, (Squadron) with strength of 9 to 12 airplanes. Two or three Squadriglie would form a Gruppo (Group) and two or three Gruppi would form a Storm (Wing). Often there would be autonomous Gruppi and sometimes even Squadriglie assigned to different front or sector.

The Gruppi described in this book are the 150 Gruppo "Gigi Tre Osei", 151 Gruppo "Asso di Spade"and 153 Gruppo "Asso di Bastoni". Also 157 Gruppo  was attached to 53 Stormo briefly and therefore included in the book.

During its lifetime, 53 Stormo had a very interesting (and colorful!) inventory of aircraft, like Fiat Cr.32, Fiat Cr. 42, Fiat G.50, Macchi C.200, Macchi C.202 and Messerschmitt Bf 109F/G. There are plenty of historical pictures in the book, including 4 rare color pictures. All of them, plus the beautiful color profiles are a great reference for the modeler.

For history-oriented readers, the book describes the involvement of different Gruppi from 53 Stormo in the Battle of France, Greece and the Balkans, North Africa, the Central Mediterranean (Malta and Pedestal and Sicily), plus Home Defense roles. It includes very detailed descriptions of the Squadriglie and Gruppi movements and actions, often including tail numbers/pilot names of the aircraft involved in combat whenever possible.

I highly recommend this book to modelers based on the reference pictures and profiles and to aviation history aficionados based on the detailed research on the detailed Gruppi and Squadriglie movements and activities.

I would like to thank Osprey Publishing for the review sample.


Mushroom Publications - Romanian Fighter Colors 1941-45

Reviewer: Pablo Bauleo
IPMS: # 46363

Publisher:     Mushroom Model Publications
Title:         Romanian Fighter Colors 1941-1945
        White Series, No 9111
Author    Teodor Liviu Morusanu & Dan Alexandru Melinte
ISBN    978-83-89450-906
     192 Pages, Hardbound, A4 size
MSRP: $59


Review

The Romanian Air Force in World War II saw extensive combat in the Eastern Front against the Soviet Air Force and against the USAAF and RAF in home defense roles. Later, in late 1944 Romania changed sides and saw combat against the Luftwaffe.

This book covers all the fighter aircraft in the Romanian Air Force during World War II. The fighter aircraft inventory included British, German, Polish, and locally designed airplanes, plus captured soviet airplanes, yielding to a rather varied set of camouflage styles. Specifically, the book covers the Hawker Hurricane, Bf 109E and 109G, He 112, Bf 110G, PZL 11 and PZL 24, IAR 80/81, plus captured Mig-3, I-16 and Fw-190A/F.

The book has chapters for each aircraft type in detail, including a brief history of the aircraft service in the Romanian Air Force before moving into a section on camouflage and markings for the given aircraft being depicted in the chapter. This section also includes information on lettering, numbers and factory logos applied to each aircraft.

After the section on camouflage styles and markings, the main feature of each chapter follows: numerous and gorgeous color profiles (sometime even 3-view or 4-views) of different aircrafts, next to a historical picture of the airplane, which in some cases is in color, but in most cases is in black and white.

Finally the book has a few appendixes covering details on Romanian Air Force ranks, paints and colors used in the aircrafts (including color code and FS equivalent) and a very detailed section on the evolution of the Romanian Air Force markings, including both Axis and Allied markings.

I've truly enjoyed reading this book. The information provided on it makes it very valuable to the modeler and several of the pictures have not been published before.

I know that I will add more Romanian models to my collection now that I have what could be the definite reference on the Romanian Fighters in World War II.

I would like to thank Mushroom Model Publications for the review sample.


Osprey - JG 400 Aviation Elite Units

Reviewer: Pablo Bauleo
IPMS: # 46363

Publisher:     Osprey Publishing
Title:         Jagdgeschwader 400
Volume 37 of Aviation Elite Units
Author    Stephen Ransom & Hans-Hermann Cammann

ISBN: 978-1-84603-975-1
128 Pages, 15 color profiles and 2 full color unit badges
MSRP $25.95


Review

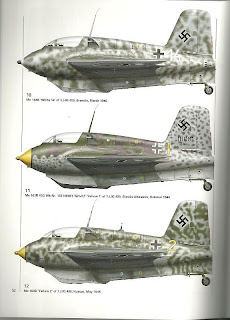
The Me-163 Komet is the only rocket-powered aircraft ever seeing combat. The whole combat history of this unique point-defense interceptor is covered by this book of the Aviation Elite Series as it only served with JG400.

The book is structured in five chapters, the first one covering the Me-163 development and the following four covering the operational service of 1.Staffel, 2.Staffel, I.Gruppe, and II.Gruppe respectively. It also has a series of appendixes covering unit organization, selected biographies, operational flight logs for each Me-163 and a very interesting appendix regarding the armament, including the use of SG 500 Jägerfaust, a recoilless mortar-style weapon which was fired vertically.

A very interesting feature of the book is that includes ample pilot debriefing reports of combat missions, both from the Luftwaffe as well as from the USAAF or RAF whenever possible, as to have information from both the pilots that flew the Komet and the pilot that faced them off.

The book has plenty of black and white pictures of different aircraft and their pilots, which will be very valuable for modelers looking for reference pictures. This book is recommended to aviation historians and modelers alike.

By reading the book is clear that the Komet had a larger impact in the Allied Air Forces as a psychological weapon than as a military weapon. As with most revolutionary technologies employed by the Luftwaffe in the closing months of World War II was "too little, too late". But the impression left in those airmen that faced the Komet would last decades.

I would like to thank Osprey Publishing for the review sample.


Revell/Renwal 1/32 Teracruzer with Mace Missile (reissue) WIP Part 2

I begin Part 2 of this WIP where I left Part 1, sanding!  Every part in the kit has now been cleaned and are tumbling freely in the box.  To preserve my sanity I just needed to be done with sanding (about 2 days worth). 

But, the fun in this kit began to take off when I started the building process.  For example, picture 1 shows 33 parts (each wheel is 2 halves) are required to make one complete “truck” assembly.  Pictures 2 & 3 show the fragility of the outer torsion bars.  Photos of the real thing seem to prove they hold up under pressure.  Pictures 4 & 5 are two views of the completed “truck”.  Some filling & sanding were necessary to fill gaps, but it looks good when finished.  I need to build two more “trucks” & they will be ready for paint.

While I waited for the putty to dry on the “trucks” I moved on to the cab.  The kit does not come with clear parts so if you want windows you must improvise.  I had some Taco Bell nachos for lunch one day & noticed the recycle symbol on the clear lid was a 2.  I tested it with some plastic cement (Testors) & it worked.  The clear lid is actually slightly cloudy, but I like the way it looks (pictures 6-8).  Pictures 9 thru 13 show progress made on the cab & tractor chassis.  The cab is void of any detail other than the steering wheel & instrument panel.  So I decided to practice scratch-building.  Picture 10 shows my novice attempt to add pedals & shift levers.  The levers are sewing pins (the heads are too big for 1/32 scale, but I like it).  The pedals are styrene sheet & rod.  I hand painted the cab (gimme a break, the first time in years I’ve put paint to plastic).  Do you see the pin mark on the steering column & the cloudiness of the windows?  Bonus, picture 14 just taken prior to this posting showing the 3 complete “trucks”.  Stay tuned for Part 3 of the Mace WIP.