June 30, 2013

Revell's 1/48 F/A-18E Super Hornet: WIP Report 6/30/13

     This week has seen some serious work on the Super Hornet, mostly remedial. I wasn't happy with the paint job on the front windshield frame, so I stripped it down to bare plastic with a good soak in Windex. While the plastic was exposed I took the opportunity to sand the framing some more as the sprue attachment points had not quite disappeared. After that, I masked the windshield again, this time using Bare Metal Foil. Once it was burnished down nice and tight with a toothpick, I cut the frame out with a brand new #11 blade. I was very happy with this and may switch permanently to BMF for my canopy masking needs.
     Once the windshield was ready, I secured it to the fuselage using Tamiya extra thin. I wanted a strong plastic weld, and previous experiments showed there was little chance of fogging. Once secure, I went to work with the putty and nail polish in an effort to blend the seams. Although most builds I've seen online show a definite seam where the windshield is glued to the fuselage, reference photos show that the real seam is so small as to be invisible in this scale. Therefore, I chose to blend it smooth. I did lose some detail during this process, namely at the refueling probe, but I hope to scribe that back in later. Here are some updated pics:

Rough fill-in before primer coat is applied.

I used MM Acryl Dark Ghost Gray to avoid using a rattle can primer. May need more  blending here.

Here too, I see some pitting that may need taken care of. I wonder if a coat of Future will hide it?

June 29, 2013

Super Larry Day 2013 - Airbrushing Clinic

      Members of the High Plains Modelers converged Saturday, June 29th at the home of Larry, where he graciously offered to conduct a four hour clinic on airbrushing and related topics. We covered paint/thinner ratios, decanting spray cans, gloss finishes, prep and sanding, masking, compressors, and airbrush maintenance, among many more topics. A variety of equipment was brought by several members for some hands-on practice. Around noon we took a break for a potluck lunch, where Larry's wife grilled brats and burgers to go with a wide array of salads, desserts and fixin's brought by the participants. I heard the deviled eggs were especially popular. We rounded out the gathering with a tour of Larry's work room and stash. Many thanks go to Larry and his wife for hosting (or putting up with) us, and to Larry and Tony for the extensive demonstrations on techniques and tools. I think it's safe to say we all had a lot of fun and learned something. Take a look at the pics:

Gather 'round, gather 'round.

Tony demonstrates how to decant a spray can.

You can see where this is going, can't you? ;)

Tony demonstrates how not to decant a spray can.

Mark and Jeff study paint/thinner ratios. 

It's always wise to spray on a test piece before shooting the model.

The first coat should be very light to give subsequent coats "tooth".

Story Time With Gary.

The group watches while Tony sands and polishes.

One advantage of a club is learning of products you haven't tried before.

Larry demonstrates how to create a paint pattern with putty and pinking shears.

The chow line. Food is about the only thing that will draw a modeler away from the bench.

Join us on the patio for an elegant outdoor dining experience. Plus, jokes you can't tell in front of the wife.

An afternoon session to hone those skills.

June 25, 2013

June 2013 Meeting

     The High Plains Modelers' June meeting featured spectacular attendance once again as the room packed in 17 modelers for an evening of styrene shenanigans. After an hour of covering business such as the missile silo tour debrief, a progress report on Nationals by guest Mark Persichetti, an update on the creation of a new website management team, and a few other items, we got down to the important business of showing off this month's builds. Check out the pics:

Gary's 1/72 Panzer IV

Jerry's Moebius Frankenstein

Pablo's P-51 Mustang

Randy's M113 troop carrier

Jeff's train station

Tomasz' Panzer IV, camouflaged with newspaper!

Mark's Toyota 

Chip's F-104 Starfighter

Scott's highly modded armored rail car


     After the Show & Tell, Pablo gave us a few tips on what not to do while applying natural metal finishes. This actually turned out to be a very informative session discussing the use of both Alclad and Testors Metallizer products.
     Stay tuned for more action packed perfection in plastic when the High Plains Modelers convene next month in July. Note: Due to a scheduling conflict, the July meeting will be held at HobbyTown USA in Fort Collins at 6pm on the usual Tuesday.

Pablo discusses the finer points of natural metal finishes. Chip looks dubious.

A selection of metalizer products. Shiny airplanes!


June 24, 2013

Alclad II Paints - Regular vs High Shine

Did you know that not all Aclad II Paints use the same primer? Did you know that some Aclad paints should not be painted over or decal solution used on them?

This is the list of Regular and High Shine paint finishes (information extracted from the Alclad II website)

Regular Alclad Finishes
  • ALC-101 ALUMINIUM
  • ALC-102 DURALUMINIUM
  • ALC-103 DARK ALUMINIUM
  • ALC-104 PALE BURNT METAL
  • ALC-106 WHITE ALUMINIUM
  • ALC-108 PALE GOLD
  • ALC-110 COPPER
  • ALC-111 MAGNESIUM
  • ALC-112 STEEL
  • ALC-113 JET EXHAUST
  • ALC-116 SEMI MATTE ALUMINIUM
  • ALC-117 DULL ALUMINIUM
  • ALC-120 GUNMETAL
  • ALC-121 BURNT IRON
  • ALC-123 EXHUAST MANIFOLD
Primers for regular Alclad finishes
  •  Alclad ALC-302 GREY PRIMER 
  • Alclad ALC-306 WHITE PRIMER & MICROFILLER 
  • Alclad ALC-309 BLACK PRIMER & MICROFILLER 
  • Tamiya or Gunze Sangyo plastic primers
REGULAR ALCLAD can be masked over and painted. Decal solutions can be used with REGULAR ALCLAD,


High Shine Alclad Finishes

  • ALC-105 POLISHED ALUMINIUM
  • ALC-107 CHROME FOR PLASTIC
  • ALC-109 POLISHED BRASS
  • ALC-114 CHROME FOR LEXAN
  • ALC-115 STAINLESS STEEL
  • ALC-118 GOLD TITANIUM
  • ALC-119 AIRFRAME ALUMINIUM
  • ALC-122 MIRRORED GOLD FOR LEXAN
Apply one of these primers before using High Shine ALCLAD:
  • ALCLAD GLOSS BLACK BASE ALC-304/305
  • ALCLAD CLEAR BASE ALC-303

Decal solutions are not recommended for HIGH SHINE ALCLAD. It is not advisable to mask and paint over HIGH SHINE ALCLAD.


June 16, 2013

Atlas Missile Silo Tour

            On the 15th, members of HPM toured a relic of Cold War history located west of Greeley in Weld County. One of the few remaining Atlas nuclear missile silos from the ‘60’s has been preserved as a combination museum and records storage facility for the City of Greeley and Weld County.
            Gary, Pablo, Marty, Randy, Marc, George, Jeff, Michael, Chip, and Chris spent around two hours inside the “coffin silo”, so named because the missile lies in its bunker in a horizontal orientation before it is raised, fueled, and fired. In addition to the missile bay, we also viewed storage and support areas, as well as the former Launch Control Center, where the crew lived, ate, and slept as well as standing a 24 hour watch ready at a moment’s notice to unleash hell. A small display on civil defense equipment and supplies rounded out the tour. Uniquely, this silo survived a direct hit by the Windsor tornado in 2008, sustaining only surface structure damage.
            The Atlas missile program was operational from 1961 to 1964. “Squadrons” of 27 missiles each were located throughout Northern Colorado and Wyoming, with four Atlas sites being located in Weld County. 82 feet tall and 10 feet in diameter, the Atlas missile weighed just over 18,000lbs empty. When filled with fuel, the missile’s gross weight was 267,000lbs, which meant that 99% of its weight was fuel. The skin of the missile was so thin that it would not support its own empty weight and would collapse if not supported. The rocket generated more thrust horsepower than Niagara Falls, and burned more fuel in its first 20 seconds of flight than a DC-7 airliner flying from New York to Los Angeles. The Atlas ICBM was preceded by the Titan series of ballistic missile, and succeeded by the Minuteman I, II, and III. Many Minuteman silos remain on active duty today.

           
       Check out the pics!

        
Atlas-E silo in its heyday.

The missile loading door, which faces north.

566th Squadron insignia

Since the real missile had been removed, this plywood facsimile was built in its place.

Access tunnel to Launch Control Center.


A wily band of hardy adventurers.

Revell's 1/48 F/A-18E Super Hornet: WIP report

    Here's the first episode of the new improved Web-hosted WIP by Nuge. Last night I took the plunge and began surgery on the cockpit windshield framing/cowl area, which was warped and causing a fit problem. In these pics you can see where I've begun reshaping that area with a file in order to get it flush. I opted not to glue down the clear piece, instead choosing to work it a little at a time and then dry fit as I go. This seems to be working. As soon as I'm happy with the fit, I'll glue it down as per normal, mask it off, then fill, sand, and hit it with a new coat of paint. Check out the pics:

1st session of filing, on front portion.

Closeup of technique.

Coming around from front to right side as I shape it.

   Stay tuned for another report in the next week or so as we see what results we get. ;)

   --Chris

June 9, 2013

The Magnificent....Three?

   Meet the new web team for High Plains Modelers! Due to some recent requested changes, Chris, Jeff, and Mike will be coming on board as webmasters to bring you more exciting modeling content on our website. Also, since Pablo has dutifully served as our sole webmaster for seven years, we think it's time he kicked his feet up and relaxed a little. So let's give a big round of online applause to these guys for all their hard work behind the scenes.

--Chris


L-R: Pablo, Chris, Jeff. Not pictured: Mike S.

June 8, 2013

Eduard 1/48 Bf-108B "Taifun"


Manufacturer: Eduard
Product: 1/48 Messerschmitt Bf-108B “Taifun” Profipack Boxing 8054

MSRP: $29.95

Reviewed by: Pablo Bauleo


Eduard has re-boxed its nice Taifun, in the profipack format this time with new, very attractive markings and new pre-painted photoetch details. You also get pre-cut, self-adhesive masks for the canopy, which makes the tedious work of masking the canopy a simple, quick and relaxing task.

This kit has been around for several years (probably more than a decade by now) but the molds hold fine. There was no flash in my sample and the engraved panel lines are crisp and clean. As with all the profipack kits, you get the option of replacing parts with photoetch details, but you still get all the parts in plastic if you are not comfortable with PE.

You also get a full engine, which is a small kit in itself. You want to assemble the engine, otherwise you will see a void in the nose when looking at the model straight from the front.

Beware that there are not many alignment pins in the fuselage, so take your time when gluing the fuselage sides to avoid having a step that would require sanding.

I only had a fit issue with the cockpit tub, as it interfered with the wheels well which are molded together with the bottom part of the wing. Some modelers have reported this issue, while some others have not run into it.

I would suggest that you glue the fuselage halves together, assemble the full cockpit (w/o gluing the cockpit sides), assemble the wings (top and bottom parts) and then dry-fit the major components together. If you have fit issues, remove some plastic from the bottom of cockpit tub to allow the cockpit tub to fit the wheel well better. Sanding of the cockpit sides might help too. It is very easy to get a perfect, step-free wing root if you do that.

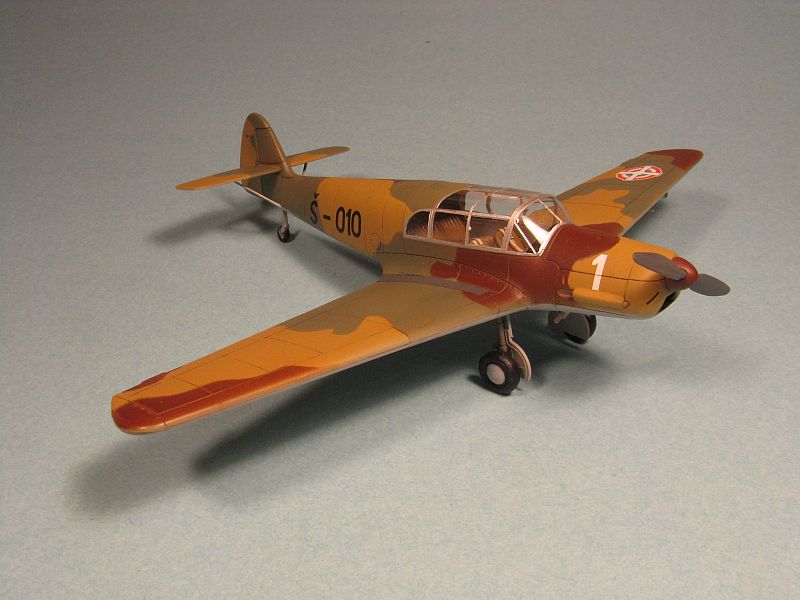
I painted my model with enamels, in the very colorful markings of the Royal Yugoslavian Air Force (great choice of markings Eduard!). The decals were applied over a coat of Future and behaved flawlessly, reacting well to setting solutions. The decals also have very good color density and registry. I applied the wing decal over the camouflage delineation mark and no color can be seen through the decal. I finished with an oil wash on the panel lines and I kept the model fairly clean, as it is depicted prior to the German invasion in 1941.

In summary: This kit is great. Assembly is simple and straightforward. I did have a fit issue, but it was easy to overcome. The pre-painted PE makes detailing an easy task. This is a good choice of a kit to cut your teeth in PE, as it is pre-painted and there are no folds or complex forms needed. The pre-cut masks for the canopy are a great help too.

If you have a few kits under your belt, you should have no problems turning this kit into a show-stopper. Highly recommended to everyone but the absolute beginner.

I would like to thank Eduard and IPMS/USA for the review sample.


Swanny's Models - DVD 1 - Basic Model Skills


Manufacturer: Swanny’s Models

Product: Instructional DVD Vol.1 “Basic Model Building Skills” (2-disk set)
MSRP: $29.00 plus shipping from http://www.swannysmodels.com/DVD.html

Reviewed by: Pablo Bauleo


A great characteristic of this series is that every now and then, a mistake happens (scratch in the paint, glue blob, etc). These mistakes are not edited out and step-by-step solutions to the problem are shown. Even there are discussions of different options on how the problem could have being solved. Matt Swan shares a lot of his experience by showing how to recover from an accident.

But let’s start for the beginning: The first volume is a 2-disk set for a running time of 3 hr 40 min. It covers, from beginning to end how to assembly and finish a Hasegawa P-40K in 1/48 scale. Before jumping into assembly and parts preparation it describes the basic tools needed for building a model and suggestions on how to setup your work area.

It continues showing how to work with clear parts, how to use Future to improve its appearance and how to mask them. It shows basic but convincing cockpit detailing (dry-brushing, decals) and then it moves into fuselage and wings assembly, including step-by-step how to fix seams, fill gaps and surface preparation. It is highly valuable to see “in-action” how to do this. I’ve certainly learnt a lot from that, in particular about how to use fillers.

Once the model is assembled it shows how to prime it (and the importance of that), how to pre-shade, apply main camouflage colors, post-shade to simulate fading due to sunlight, gloss coat and how to use setting solutions when decaling. But if all that is not enough, it also shows how to apply a wash to the panel lines, for full weathered look. The DVD ends with final assembly of landing gear, and clear parts.

This is a great set for the beginner and the modeler returning to the hobby. It is also very good for the experience modeler, as it shows and reinforces modeling good practices.


I would like to thanks IPMS for the opportunity to review this DVD sets and Matt Swan for his mentoring in my return to the modeling world.

Eduard 1/48 Airacobra Zoom


Manufacturer: Eduard
Product: FE 435 Airacobra Mk.I S.A. Zoom for Hasegawa kit
This review was first published at the IPMS/USA website (http://www.ipmsusa.org)
Reviewed by: Pablo Bauleo
The Airacobra/P-39/P-400 series of airplanes, due to their car door access deserves a detailed cockpit. The Hasegawa kit provides a very nice cockpit out of the box, but Eduard provides an even nicer detail with this fret.

The Zoom PE detail fret is intended to be simpler and require less bending/folding/painting than their full-blown counterpart. I like that. But, this fret is of the “self-adhesive” kind and, honestly, I didn’t like that. The glue was missing in half of the fret (maybe it was intended that way), and having to remove the part while keeping the wax paper attached to the back, it wasn’t as simple as I thought it would be.

I also came across to a minor issue with the seatbelts. According to the instructions you are supposed to get the two-part seatbelt together and then fold the buckles from the back part onto the front one. However the seatbelts were molded together with the back part seatbelt, as a single piece. I just left out the top part of the seatbelt, to keep the buckles visible. 

Now, on the bright side, the instrument panel is delightful, very simple to assemble and very realistic on its looks. The machine gun handles, very prominent in this aircraft, are very nicely rendered, as well as all the instrument dials and bezels.

The fret also includes side console and cockpit door details. I like the placards for the doors. You cannot read them, but you can see them very clearly and adds to the whole cockpit “feeling” of the kit.

I had a mixed experience with this fret, but overall it was a positive one. The fret is simple to work with (mostly flat parts and just a few bends) and it provides a lot of detail. The only downside is the self-adhesive. In my humble opinion, it makes the assembly more difficult, instead of simpler.

I would highly recommend it for any modeler that has a few PE under their belt, and even to the modeler that is itching to break into photo-etch details. As I said, the Zoom frets are amongst the simplest ones to work with.

I would like to thanks Eduard for providing the review sample and IPMS/USA for allowing me to review it. 


All-American Car Show July 13, 2024

All-American Car Show July 13, 2024

ALL AMERICAN CAR SHOW Details

The All-American Car Show is inviting contestants for the Model Show in Loveland, CO ages 17 or younger. Please see the details below: Model Building contest for Cars & Trucks only. Eligible contestants are those who are 17 or younger. Fee: Free to enter Model Build contest. Main event: All American Car Show. Date: Saturday July 13th, 2024. Time: 8am - 2pm (Model contest judging at 11am). Location: Loveland Sports Complex, 950 N. Boyd Lake Ave. Loveland, CO. Awards: Best in Show: 1st, 2nd & 3rd place. Note: Those who wish to bring their model car or truck just for show and no award is open to all ages.