

Showing posts with label Works-in-progress. Show all posts
Showing posts with label Works-in-progress. Show all posts
May 24, 2015
Aurora 1/228 USS Skipjack Atomic Submarine (Done)
The 40 year old decals fell apart, but, I was able to "save" the ID plate decal. It went on without a hitch, but, then cracked and fell apart. I'm calling this one done. I will eventually print decals.

Revell/Renwal 1/32 Teracruzer with Mace Missile (reissue) WIP Part 4
In part 3 I was in the homestretch. That was 2 years ago! Now I really am on final approach.
The only remaining assembly is the cab and then decals. I painted my Mace in an operational scheme and most of the kit decals won't work. When I print my own decals this project will finally be done. This kit was a bear with all the sanding, but I like the way it turned out. I'm very happy Revell reissued this interesting, but, important part of America's early missile program.


The only remaining assembly is the cab and then decals. I painted my Mace in an operational scheme and most of the kit decals won't work. When I print my own decals this project will finally be done. This kit was a bear with all the sanding, but I like the way it turned out. I'm very happy Revell reissued this interesting, but, important part of America's early missile program.


August 11, 2013
Aurora 1/228 USS Skipjack Atomic Submarine
A very easy kit from 1970 with only 23 parts.
There are several locations on the hull where incomplete molding is obvious & must be filled & sanded. The plastic is very soft & care must be taken not to remove too much. The hull half's do not fit together "perfectly" so sanding is required to smooth it out.
The submarine has very little detail. Also, this Skipjack release comes with a nuclear reactor that can be viewed by removing the aft dorsal hatch (pic 1, circle aft of the sail). I just had no desire to mess with it so I sealed off the hatch. A later issue of this kit (pic 3) included a "Phota-Scope" feature in place of the nuclear reactor. The kit also comes with a single periscope which I also chose to leave off based on several reference photos. Finally, the sub was delivered with a 5-bladed propeller not the 3-bladed prop in the kit.
This baby needs a little more prep & will be ready for paint.


Revell/Renwal 1/32 Teracruzer with Mace Missile (reissue) WIP Part 3
The homestretch update!
Missile & translauncher are ready for paint. The cab needs to be finished & the Teracruzer will be ready for paint.
Looking good!

Missile & translauncher are ready for paint. The cab needs to be finished & the Teracruzer will be ready for paint.
Looking good!

July 24, 2013
Revell/Renwal 1/32 Teracruzer with Mace Missile (reissue) WIP Part 2
I
begin Part 2 of this WIP where I left Part 1, sanding! Every part in the kit has now been cleaned and
are tumbling freely in the box. To
preserve my sanity I just needed to be done with sanding (about 2 days worth).
But, the fun in this kit began to take off when I started the building process. For example, picture 1 shows 33 parts (each wheel is 2 halves) are required to make one complete “truck” assembly. Pictures 2 & 3 show the fragility of the outer torsion bars. Photos of the real thing seem to prove they hold up under pressure. Pictures 4 & 5 are two views of the completed “truck”. Some filling & sanding were necessary to fill gaps, but it looks good when finished. I need to build two more “trucks” & they will be ready for paint.
While I waited for the putty to dry on the “trucks” I moved on to the cab. The kit does not come with clear parts so if you want windows you must improvise. I had some Taco Bell nachos for lunch one day & noticed the recycle symbol on the clear lid was a 2. I tested it with some plastic cement (Testors) & it worked. The clear lid is actually slightly cloudy, but I like the way it looks (pictures 6-8). Pictures 9 thru 13 show progress made on the cab & tractor chassis. The cab is void of any detail other than the steering wheel & instrument panel. So I decided to practice scratch-building. Picture 10 shows my novice attempt to add pedals & shift levers. The levers are sewing pins (the heads are too big for 1/32 scale, but I like it). The pedals are styrene sheet & rod. I hand painted the cab (gimme a break, the first time in years I’ve put paint to plastic). Do you see the pin mark on the steering column & the cloudiness of the windows? Bonus, picture 14 just taken prior to this posting showing the 3 complete “trucks”. Stay tuned for Part 3 of the Mace WIP.
July 16, 2013
Revell's 1/48 F/A-18E Super Hornet: WIP Report 7/15/13
I was finally able to find some time to get back on this bird, and it was time for decals. After applying a couple of coats of Future with the airbrush, I went to work. Revell, let me say this to you now: whoever did your decals for this kit really screwed up. I found a host of inaccuracies and even omissions from the decal sheet. Based on reference pictures AND a substitute sheet of markings from TwoBobs, Revell's decal sheet was very disappointing. The elevon "No Step" markings were the wrong shape. Other warnings were the wrong color or instructions placed them in incorrect locations. They are adequate for a beginning modeler, at best.
After two 2hr sessions, I have about 3/4 of the plane completely marked, mostly with the TwoBobs markings for a bird from VF-31. I'll try to finish up tonight. Then after a day to dry, we'll be going together with all the fiddly bits such as undercarriage, weapons, and canopies. Here's a teaser pic:

--Chris
After two 2hr sessions, I have about 3/4 of the plane completely marked, mostly with the TwoBobs markings for a bird from VF-31. I'll try to finish up tonight. Then after a day to dry, we'll be going together with all the fiddly bits such as undercarriage, weapons, and canopies. Here's a teaser pic:
--Chris
July 6, 2013
Revell/Renwal 1/32 Teracruzer with Mace Missile (reissue) WIP
This is a Revell reissue of the Renwal
kit from the late 1950s (Picture 1).
The kit actually contains three sub-kits (Teracruzer, transporter-erector-launcher [not a trailer], and missile).
I purchased this kit because it is a unique subject, fits into my USAF collection, the original Renwal is too expensive in the secondary market, and it’s just plain cool looking.
The kit actually contains three sub-kits (Teracruzer, transporter-erector-launcher [not a trailer], and missile).
I purchased this kit because it is a unique subject, fits into my USAF collection, the original Renwal is too expensive in the secondary market, and it’s just plain cool looking.
However, I must say I am not
enjoying this build. Every piece is covered with flashing and
ejector pin marks. Raised mold
demarcation lines are clearly visible as well.
Also, most parts do not fit together well. Not to mention the plastic is very soft. Which means parts break very easily when
removing from the sprue (guess how I know).
It also means you must be careful to not take off too much material when
sanding (guess how I also know this).
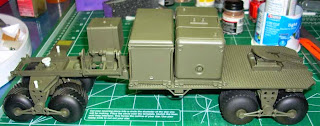
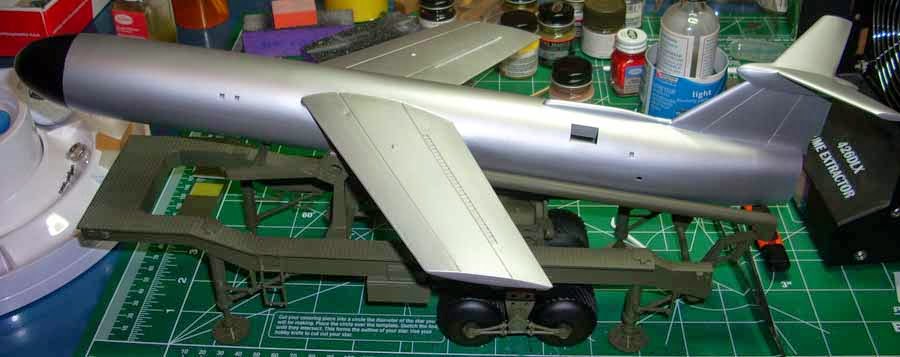
Assembly has been on-going for a
while and the missile along with its transporter-erector-launcher (TEL) are
almost ready for priming (Pictures 2 & 6).
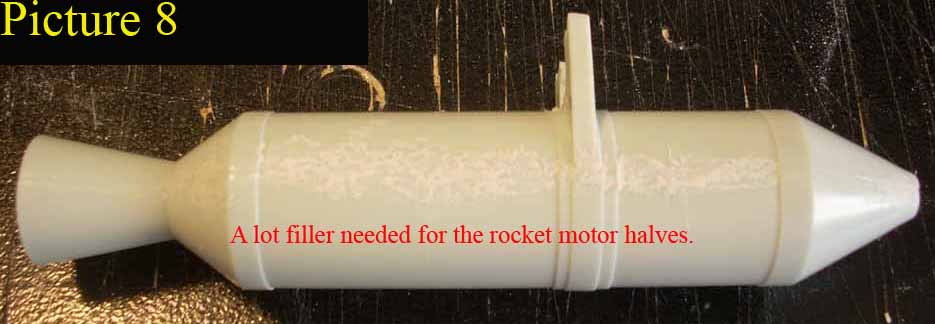
Pictures 6, 7, and 8 highlight what I’ve already mentioned about filling
and sanding. Pictures 3, 4, and 5
illustrate the only cleverness in the kit.
Each of the four outriggers is keyed because there are two long and two
short and all four have attachment points that must face inward or outward to
meet other parts. Picture 9 is the
beginning of construction on the Teracruzer.
I’m not looking forward to it.
Can you guess? More filling and
sanding.
My assessment is the kit would be
a quick and easy build if it didn’t require a lot of filling and sanding . The only reason I haven’t sold it is because
I know it will be an awesome piece when complete. Provided the world hasn’t run out of putty
filler. I used a half a tube to finish
half the kit. Get this kit if you really
want a cool piece in your collection.
Avoid it if you dislike sanding.


June 30, 2013
Revell's 1/48 F/A-18E Super Hornet: WIP Report 6/30/13
This week has seen some serious work on the Super Hornet, mostly remedial. I wasn't happy with the paint job on the front windshield frame, so I stripped it down to bare plastic with a good soak in Windex. While the plastic was exposed I took the opportunity to sand the framing some more as the sprue attachment points had not quite disappeared. After that, I masked the windshield again, this time using Bare Metal Foil. Once it was burnished down nice and tight with a toothpick, I cut the frame out with a brand new #11 blade. I was very happy with this and may switch permanently to BMF for my canopy masking needs.
Once the windshield was ready, I secured it to the fuselage using Tamiya extra thin. I wanted a strong plastic weld, and previous experiments showed there was little chance of fogging. Once secure, I went to work with the putty and nail polish in an effort to blend the seams. Although most builds I've seen online show a definite seam where the windshield is glued to the fuselage, reference photos show that the real seam is so small as to be invisible in this scale. Therefore, I chose to blend it smooth. I did lose some detail during this process, namely at the refueling probe, but I hope to scribe that back in later. Here are some updated pics:
Once the windshield was ready, I secured it to the fuselage using Tamiya extra thin. I wanted a strong plastic weld, and previous experiments showed there was little chance of fogging. Once secure, I went to work with the putty and nail polish in an effort to blend the seams. Although most builds I've seen online show a definite seam where the windshield is glued to the fuselage, reference photos show that the real seam is so small as to be invisible in this scale. Therefore, I chose to blend it smooth. I did lose some detail during this process, namely at the refueling probe, but I hope to scribe that back in later. Here are some updated pics:
 |
| Rough fill-in before primer coat is applied. |
 |
| I used MM Acryl Dark Ghost Gray to avoid using a rattle can primer. May need more blending here. |
 |
| Here too, I see some pitting that may need taken care of. I wonder if a coat of Future will hide it? |
June 16, 2013
Revell's 1/48 F/A-18E Super Hornet: WIP report
Here's the first episode of the new improved Web-hosted WIP by Nuge. Last night I took the plunge and began surgery on the cockpit windshield framing/cowl area, which was warped and causing a fit problem. In these pics you can see where I've begun reshaping that area with a file in order to get it flush. I opted not to glue down the clear piece, instead choosing to work it a little at a time and then dry fit as I go. This seems to be working. As soon as I'm happy with the fit, I'll glue it down as per normal, mask it off, then fill, sand, and hit it with a new coat of paint. Check out the pics:
Stay tuned for another report in the next week or so as we see what results we get. ;)
 |
| 1st session of filing, on front portion. |
 |
| Closeup of technique. |
 |
| Coming around from front to right side as I shape it. |
Stay tuned for another report in the next week or so as we see what results we get. ;)
--Chris
Subscribe to:
Comments (Atom)
All-American Car Show July 13, 2024
